CopyWipe Hard Drives
A utility from TBU (TeraByteUnlimited) for cloning one hard drive to another. (It can also be used to 'sanitize' or 'zero' or 'wipe' a complete hard drive by writing zeros to its data surface and completely destroy all data on the drive in the process).
Both the copying and the wiping components of this utility can destroy personal data if you are not careful or sure about what you are doing. If in any doubt about which is the target drive then back-out. To only attach the target drive in an external USB enclosure or to a converter cable is one way of making identification easier. The TBU CopyWipe page has links to the sort of equipment that can be used to attach hard drives in this manner and we have added a couple of examples in the notes at the end of this page.
- First of all grab this direct download of CopyWipe for DOS (free; 556 kB) and unzip it.
- Insert a blank floppy diskette or a blank CDR/CDRW into its drive.
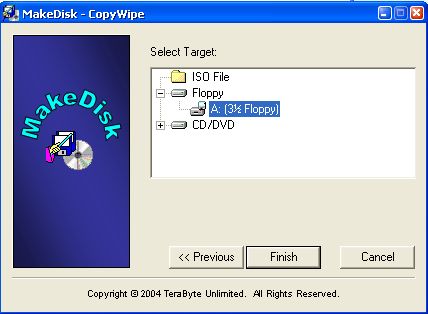
- Run the makedisk.exe file inside the unzipped download.
- Choose Floppy or CD as appropriate from the makedisk options, click "Finish" and wait for your bootable medium to be created.
- Attach the two relevant hard drives; one the source and one the target.
- Boot the PC to your newly created bootable floppy or CD (setting the boot order in the BIOS, etc) as necessary.
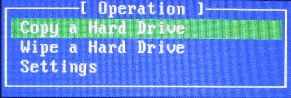
- Choose "Copy a Hard Drive"
.
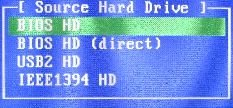
- Choose BIOS HD (or USB or Firewire/IEE1394 for an external drive if appropriate).
- Choose the correct Hard Drive from any list if there is more than one of that type.
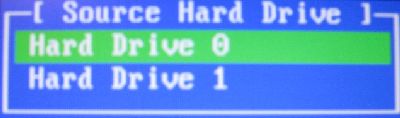
- Repeat as above for the Target Hard Drive.
- Double-check that you have chosen the correct Target Hard Drive. Once copying starts, original data on the chosen Target Drive will be overwritten.
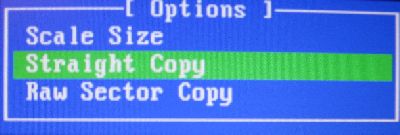
- We
suggest that you choose "Straight Copy" and do any resizing later using
BootIt-NG or GParted or similar but do choose "Scale Size" if you want
all of the space on the new drive to be utilised and you are sure that
the BIOS and your system will support such a resized drive. Note that a
combined copy and resize will take longer than a Straight Copy.
- If unhappy at this stage then back-out by not agreeing to the final screen and go and seek help or read the manual again.
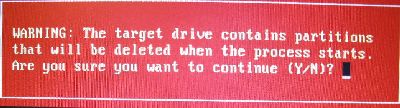
- If you agree to the cloning then enter Y and go make some tea or let it run overnight.
Notes:
- If cloning a hard drive containing an NT-based version of Windows (Win2K, WinXP, Win2K3, etc.) do ensure that the original source drive is totally removed from the system immediately after cloning has taken place. Only then attach the cloned drive as the chosen boot device and boot to it. (The boot order of devices is normally set in the BIOS SetUp by using a specific key press during start-up or in some systems another key press can bring up a boot menu). The new cloned operating system should not ever be allowed to "see" the original hard drive until the new clone has been booted to successfully and then rebooted to successfully. This process locks the values in the registry. After that the original drive can be added back in and the drive letter assignments of the new clone will not be affected.
- It is not necessary (indeed one of the beauties of this approach is that one stays outside of windows) to run this program from within any version of windows. The customised OS on the boot CD or boot floppy is all that is required. TBU do make a windows version of this software available but we only recommend doing this sort of work completely from outside Windows.
- Example of a combined laptop/desktop IDE to USB converter cable.
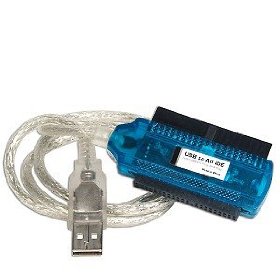
There are a wide range of these types of converters. There are ones that can also attach to SATA drives and ones that come with their own power supplies. Only ever attach one drive at a time to these converters. The one shown here would need to be attached to an appropriate molex power lead inside the PC for Desktop 3.5" drives. Laptop 2.5" drives should get all the power they need via the USB cable. A bit of Googling should throw up many examples. - Example of an external USB2 enclosure for a 2.5" laptop hard drive.
Existing drives within a laptop are, as a rule, pretty easy to remove from most laptops. Have a look at your manual if you can't find how to do this easily. Enclosures for 3.5" desktop drives are similar but a bit larger and need to have an accessory source of power.