Connect USB Headers
N.B.
These
notes are intended only for guidance. Incorrectly wiring or
connecting-to the Universal Serial Bus can destroy your system.
Unfortunately the
one thing that is not universal about USB is the way connections are
made to headers on the motherboard. These headers have pins which come
with radically different pin-outs and with pins having different
functions on different boards. You must read your manuals
carefully before attaching any wires from front panel or any other
equivalent
ports or devices directly to the motherboard. It can also be possible
to confuse
USB and Firewire (both their headers and any front-panel wires) so do
take real care and we can take no responsibility for the consequences
of whatever actions
you may decide to take. Case-makers and motherboard-makers have not
co-ordinated their hardware for some time - though as time passes a
more uniform approach is gradually taking shape.
USB Speed Considerations - Don't confuse Full (1.1) and
High (Hi/2.0)
-
There are three different specifications. Low, Full and High
speed, which can allow transmission of data at rates of up
to 1.5, 12 and 480 Mbits/sec (or 0.187, 1.5 and 60 Mbytes/sec
respectively). In practice the rates achieved are likely to be some 50%
of these maxima. High and Full Speeds can only be attained if special
attention is
given to screening and of having the data wires as a "twisted pair".
Some specifics are detailed later in this article under "Shielding
Specifications and Notes".
Commonly Used Abbreviations and Standard* Wiring Colours
- VCC = SVCC = VBUS =
PWR = USBPWR = POWER = +5V (RED
or ORANGE)
- -D = SBD- = DATA- (WHITE
or YELLOW)
- +D = SBD+ = DATA+ (GREEN
or GREY)
- GND = GRND = GROUND
(BLACK or BLUE or BROWN)
- NC = Not
Connected
- OC = USBOC = Over
Current Signal
- Key = Empty = No Pin
- Drain = Shield =
Shell = Supplementary Ground (usually also BLACK).
* We have called the colours "Standard Colours". The USB
specification never mentions any specific colouring stating no more
than that it is "Vendor Specific". However throughout the specification
the authors always use (both in text and actual colour diagrams) RED,
WHITE, GREEN AND BLACK, just as outlined above, in all diagrams and
descriptions of the power, data and ground wires. Bear in mind too that
wiring can be wired incorrectly and that vendors have carte blanche as to what they do
decide to use.
Low Speed and Early Header Arrangements
- Low speed is all that is required for HID (Human Interface
Device) equipment such as Mice and Keyboards. These were the first USB
devices to come on stream and there was even native support for them
under Win98SE. In the beginning just four unshielded/untwisted
wires were connected from each port to four specific pins on a
motherboard header.
- Such unshielded/untwisted 4-wire cables are most commonly
identified
by
being Red (5V Power), White (Data-), Green (Data+) and Black
(Ground)
and only support low speeds. At the other end (the case end) these four
wires
most commonly attach directly
through to the
four connectors inside series A (Fig 1) or series B receptacles.
Just four (1,2,3 and 5) of the five connections inside a mini-USB
series
receptacle would be equivalent.
- Motherboard headers "typically"
have two rows of up to five pins
for
connecting to two individual ports. Some have them in one long row,
some have them in groups of four-pins or even just one four-pin header
on its own. Pin 1 is usually the bottom leftmost (or top rightmost).
But they are even described as being reversed with Pin 2 being the
bottom leftmost (or top rightmost). In our experience this latter
orientation is more normal for Firewire headers, but it only
exemplifies the importance of looking carefully at your motherboard's
specific details. Pin 9 (on both Firewire and USB ports "usually" has an empty/absent pin.
- Take particular care when attaching any wires to these header
pins since
it is easy to put individual wires onto the wrong pins or a block of 10
over just 8 of the 10 pins, etc, etc. Only attach them with the PC
powered down, the power disconnected and then having pressed the
power-on switch.
- Each complete group of four cable wires can be
connected to an equivalent group of four pins - but this is where the
first care really needs to be taken. Although 90% of boards use the
Intel layout where pins 1, 3, 5, and 7 are equivalent to pins 2, 4, 6
and 8 and would connect to red, white, green and black low speed
cable respectively - on some boards (notably Gigabyte boards) they use
a sort of flipped configuration with pins 1, 3,
5 and 9 being equivalent to its pins 10, 8, 6 and 2 yet these would
connect
to the same red, white, green and black wires respectively. BUT CHECK
YOUR MOBO'S MANUAL. A few examples follow and the blanked black cells
are
NC (Not Connected) to any wire. Power and Ground pins are enumerated
with
Red and Black letters and Data Minus and Data Plus with White and
Green letters respectively. A wide range of variations exists but the
following three are perhaps the most common ones seen for early
hardware designs.
-
Early "Intel type"
-
Early One-Port "Gigabyte type" (eg GA-6WMM)
-
Early Two-Port "Gigabyte type"
-
Another reported variation
Full-Speed and Hi-Speed
- Adequate shielding of cables and the use of a "twisted pair" of
data cables for each port is required to allow these faster USB data
communications. It is not mandatory (as some believe) to run a
shielding drain wire to a specific motherboard header pin to achieve
this. Full
Speed and High Speed can both function quite adequately with just one
(for a single port) or two (for a pair of ports) 4-wire assemblies.
Modern systems (both cases and motherboards) now usually have an
additional wire and this wire and the extra (or ninth) pin it may
attach to on the header pin-outs is probably the least understood and
the most common cause of confusion over just how to connect a front
panel to a USB header.
- If in any doubt then just use the four fundamental wires from
each
port and attach them to their corresponding four header pins - just as
above. It is usually obvious as to the correct group of four wires but,
with
no apologies for repetition, do check your motherboard's manual to
confirm the correct pin layouts and the pin-out designations.
The Extra Pin
- The extra pin often now found (in 9/10-pin or 5-pin or 2x5-pin
layouts) - is MOST COMMONLY an extra ground and can usually be
ignored - especially if designated as NC. Don't use it if unsure, as if
the input
should happen to come directly from any downstream overcurrent (for
example an abnormal current from a defective powered peripheral or
cable), it would be best
to not short it directly to ground by this route. There are reports
of USB connections become
hot
and melting plastic so if anything like that is happening we suggest
you just use the four mandatory wires per port.
- If your USB2 HiSpeed is not up to the mark, read and re-read the
description of the wires from the ports and the details of the
motherboard pin-outs. If the motherboard ships with its own
back-brackets and
matching composite 9/10-pin plugs then they should be quite safe to
attach
to the
motherboard headers.
- Over-Current (OC/USBOC) commonly gets described as Open
Connection - and very
often intrepreted as meaning the same as NC or No Connection or
Normally Closed. We treat such comments (and indeed all abbreviations)
with suspicion and note that Intel recommends the following advice (our
own comments are in italics within brackets) to
motherboard manufacturers:- "It is recommended
that the over current protection device for the front
panel header be included on the motherboard to prevent damage to the
motherboard. This should be implemented only if the front panel
solution does not include a connector
card (daughterboard) that
includes over current
protection. If a specific front panel cable solution is not
provided (for example by attaching
directly to a USB device),
it is safer to assume the front panel solution won’t provide over
current protection. With this being the case, include the over current
protection on the board and clearly
document that over current
protection is provided on the board. Be sure to place the over
current
protection device downstream of the bypass bulk storage capacitor so
not to cause droop failure (which
relates to two adjacent ports affecting each other's effectiveness)".
Note that any overcurrent from downstream is a different issue than
mis-connecting wires to the header, which can cause damage even if
there is an on-board fuse-element for that header block.
- On any front-panel daughterboards that we have examined the
normal ground wires and any shielding drain wire have been connected
either directly or
quite
simply to one another via a resistor. Once sure of this arrangement we
have never had
any worries about attaching the 9th wire to pin10 on a "Late Intel
Type" header as below. What you decide to do
is up to you.
- If the 9th wire from a two-port header block is a
drain/shell/shield
wire and the
motherboard header's has a drain pin (usually pin10) running to ground
then these two can certainly be connected
to one another. This has now become the most standard layout and even
the Gigabyte boards now seem to be adopting this with this 9th wire
running to pin10 on the header.
-
Late "Intel type" (now the most common arrangement seen). Pin 9 is
usually removed from the header which, then being empty, means that its
equivalent wire socket can be filled
with plastic to minimize the chances of mixing-up USB and Firewire
connections since the nine available slots can then only fit over the
nine equivalent remaining pins. Pin 10 is normally a supplementary
ground but also may be designated as NC.
-
The same Late "Intel type" but using a different combination of
"standard" wiring colors.
- If pin10 is designated as OC then it is a specific ground that
can be used detect a specialised low logic signal and thus be capable
of indicating that an overcurrent situation exists. We have yet to come
across equipment that provides such a signal so unless you have a wire
from a panel or other device that specifies that it can carry an OC
signal then it is probably a redundant and unnecessary feature. If,
having attached 9
wires from a front-panel, the port doesn't function try removing or
cutting the "ninth wire". The metal sleeve inside each slot will
usually pull straight out if its little plastic flange is teased
slightly open with a large needle or the point of a small knife.
Testing/Checking the Designated Front Panel Wires
- If you are seriously worried (because you doubt the color coding or for
any other reason) about which wire goes to which USB contact then an
ohm-meter/multi-meter can be used to check things out. If you don't
have a meter you can still check which wire is which using a battery in
series with a bulb in series with the wire in question. This can save
having to dismantle the front panel to follow the wires to their
destinations. Looking-into a TypeA Port Receptacle with the narrow part
at the top the contacts from left to right would be 1, 2, 3 and 4
respectively and with any shielding running to the metal rectangular
surround:-
-
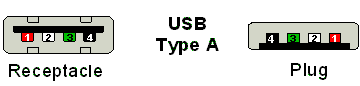 Fig 1
Fig 1
Overcurrent Review
- The PCB Daughterboard or Connector-Card on which the Front-Panel
ports are placed may or may not contain overcurrent protection.
- Intel recommends to motherboard manufacturers that the VCC to
Vbus (the 5V-Main to 5V-Front-Panel-Header) circuit(s) should contain
an on-board Fuse-Unit Thermistor (1.5A for two ports) for the greatest
protection against a Vbus-to-Ground short as the cause of an
overcurrent draw. This is recommended even though it is unlikely to be
necessary if, even an unfused, front-panel daughterboard uses another
overcurrent protection scheme. An on-board thermistor would however
protect the motherboard from a damaged header-to-front-panel cable or
assembly.
- Not, by any means, is every Pin10 demarcated for OC
(Over-Current) detection and
an OC signal wire should only be attached to
this pin if
it is demarcated as an OC solution from the front panel daughterboard.
Both the
normal Ground wires and any OC wire are designed to run to
ground but they are separated downstream by electronics that allow a
logic signal
to be picked up on the OC pin and thus allow the overcurrent to be
detected and any on-board protection instituted or warnings given.
- If Pin10 is demarcated as NC (No Connection) or if it is not
clear-cut that the motherboard can set in place OC protection then no
wires should be connected to this pin-out and making any such
connection can result in failed USB port access. In such circumstances
any such block should have the inappropriate OC wire cut or
removed fromt the block and only 8 pins (for a two port assembly)
utilised.
Shielding
Specifications and Notes
- Both High and Full-speed cables consist of one 28 to 20 AWG
non-twisted power pair and one 28 AWG twisted data pair with an
aluminum metallized polyester inner shield, 28 AWG stranded tinned
copper drain wire, > 65% tinned copper wire interwoven (braided)
outer shield, and PVC outer jacket. The interwoven (braided) tinned
copper wire outer shield must encase the aluminum metallized PET
shielded power and signal pairs and must be in direct contact with the
drain wire.
- The minimum marking information for High and Full-speed cables
must include: "USB SHIELDED <Gauge/2C + Gauge/2C> UL CM 75".
- The shield's drain wire should be terminated to the
receptacle-casing and this in turn grounded by one of a number of
schemes. Peripherally connected USB devices should not be grounded
separately. The grounding
scheme for USB devices, and cables must be consistent with accepted
industry practices and regulatory agency standards for safety and
EMI/ESD/RFI.
- Many front panel daughterboards ground the shielding drain wire
via "the ninth wire" to its relevant motherboard header-pin but
others, particularly back-panel brackets, can discharge to ground via
other routes that attach to the case.
In some instances the grounding may have an inductor or capacitor
interposed to dampen RF interference.
- The fact that both overcurrent detection and grounding of the
drain wire can use a common pathway is just one other cause of
confusion of just what the function of the specialised 10th header-pin
entails. So yet another nomenclature for this pin is to sometimes call
it a
shield or drain pin. As should have been seen already, it is not
mandatory to use this pin or this routhe to
ground the shielding; shielding that is a requirement for the support
of USB High
and Full speed data transmission.
References
- USB
2.0
Specification
- Power
Delivery Design Issues for Hi-Speed USB on Motherboards ("Intel
Whitepaper" in pdf format)
- High
Speed USB Platform Design Guidelines ("Intel Guidelines" in pdf
format)
- Chapter
6
of the USB 2.0 Specification: Mechanical ("The mechanical and
electrical specifications for the cables, connectors, and cable
assemblies used to interconnect USB devices" in pdf format)
Web design by paulski.com
- last updated
28th February 2010
Pages best viewed using a CSS2-compliant browser such as Firefox or Opera

