Data Recovery/Access Basics
Quick Overview: This page is not intended to be a complete guide on how to recover data from hard drive partitions but it is hoped that some of the more common problems can be outlined and with some ideas of how they might be addressed. There are three main reasons why you may not be able to access your data. (1) There may be complete Hard Drive (or other) hardware failure, (2) The PC may begin to start-up OK but may then fail to boot into the Operating System and (3) The Operating System may load but then all or parts of it be inaccessible; files may be missing and partitions may also have disappeared or be unreadable because of corruption or by appearing to be unformatted.
If there is a basic hardware problem then it is nearly always worth trying to access an internal hard drive by removing it and trying to access it with another computer (if only to help diagnose the nature of the problem). It could be added internally to any appropriate free 'slot' or else be attached externally via an appropriate converter cable or in an external enclosure. Conversely, if an external hard drive has become inaccessible it is nearly always worth removing it from its enclosure and attaching it to an appropriate slot inside a PC.
We admit there is quite a lot of reading on this page but we hope that you, particularly if you have inaccessible data, will forgive this. To those that are in such a position, try not to panic and do something that you later regret.
Two important notes if there is lost or otherwise deleted data:-
(1) Stop using your PC normally. That is unless the relevant files are kept on a
dedicated hard drive or data partition that is not a system or boot partition.
If it is the C: drive or Windows partition that contains the missing data, only attempt to access the files by either taking out the hard drive and then access it from another PC or else boot to a Utility/Live CD and attempt access that way. Both actions minimise the chances of overwriting the "deleted data".
(2) Stay well away from disk-checking or defragmentation programs which,
because they can manipulate data on the drive, may make data recovery less rather than more likely.
Microsoft confirm this on MSKB 176646 and we
completely agree with the advice to first backup your hard drive if you want to disk check (with
write options) in the presence of missing data.
Hard Drive Failure
HDDs (Hard Disk Drives) do eventually fail. Some very early on and some after years of reliable service. There may be some or no warning. That is just one reason why one should always have backups of any important data, preferably having been verified on a removable medium and then stored in a safe place.
If an internal HDD cannot be recognised by a system's BIOS Setup (see next section) then as long as this is not just because of a connectivity problem (and particularly if the problem is duplicated in another PC) it will probably take very expensive professional recovery (such as when a drive may have to be disassembled and rebuilt in a laboratory) to effect any hope of data recovery. Connectivity problems include such things as inappropriate jumper settings, bad cables or connections (eg broken or loose pins), absent/poor power supply and even the host controller being disabled in the BIOS setup. One other BIOS related reason (less seen nowadays) could be because there is too large a hard drive (in MB or GB) for an older BIOS that is not capable of supporting drives beyond a certain threshold.
It is sometimes possible to "mend" a failed drive by replacing its, usually green, PCB (Printed Circuit Board). This involves finding a matching PCB and with as close a match as is possible. This is less and less likely to work with more and more modern HDDs. Another seldom successful method is to put the drive into a ziplock bag in the freezer overnight and then attempt to access it before it gets properly warmed-up. If this works it is likely to only work once so be fully prepared to copy or clone your data before you start down this road.
The BIOS Setup Basics
Accessing the BIOS Setup area is usually indicated by a specific key-press (aka hot-key) commonly DEL or F2 or ESC to be made during start-up as indicated on the monitor's display. An immediate reboot may be needed to see this message since often the monitor will not have warmed-up enough in time to make the key-press options visible. The Pause key can often be used to freeze the intitial displays and the ESC key then used to release the freeze. The ESC key can also often remove any manufacturer's splash screen and reveal all the BIOS lines of text during start-up.
Internal hard drives in desktop PCs come in three main varieties; SCSI (seldom used in domestic PCs), IDE (aka Parallel ATA) and SATA (Serial ATA). IDE drives attach to 40-pin data ribbon cables and a 4-pin "Molex" power connection and must be jumpered appropriately for their position (in the middle or at the end) of the cable in order that the BIOS setup can properly identify them. SATA drives attach to a 4-wire narrow but thicker (usually red) data cable and the plugs have an L-shaped connector. SATA power cables vary in type; older drives can have 4-pin Molex connections but most now have a wider reversed L-shaped connection. Jumpering may sometimes be needed on SATA drives to reduce the data access speed on 3.0 speed drives when attached to a 1.5 speed motherboard.
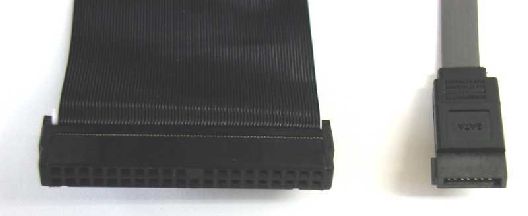
Fig 1. IDE (left) and SATA (right) data cables/connectors.
An understanding of such connections and jumpers is important since, if incorrectly configured or if damaged, they can result in a drive not being visible in the BIOS setup. A hard drive that has failed will also not usually be identifiable at all in the BIOS setup. Once inside the BIOS setup you should be able to identify all such hard drives directly attached to the motherboard. [Drives attached to PCI or other host controller cards are usually accessed by a secondary BIOS setup, which is entered using a different key press after the main BIOS setup option]. If a drive is not identified in a BIOS setup then there is virtually no hope of accessing it in any way from that particular computer. It should also be noted that one or two IDE devices can share a cable and though this relationship gets called master and slave, neither one is subservient to the other. A slightly different issue is that only one device in the BIOS setup may be set as the preferential boot device. If there are hard drive access problems it is worth setting this to the specific hard drive in question.
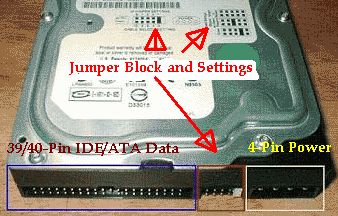
Fig 2. Connections on a Western Digital IDE drive.
The BIOS display in Fig 3. relates to (a) one IDE/PATA Western Digital hard drive attached to the end of the IDE cable (the standard "master" position) on Channel 0; (b) a DVD ATAPI Drive attached to the end of the other IDE cable on Channel 1 and (c) a SATA Samsung hard drive attached to the second SATA channel (Channel 3 in the example shown). Note that IDE and ATA and ATAPI (the equivalent notation for optical drives) are often used interchangeably. Note also that any SATA drives attached are always (or should be) designated as Master because there can only be one drive per channel; each channel being linked to one particular slot or header on the motherboard.
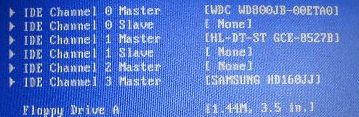
Fig 3. Standard CMOS BIOS Setup showing IDE/ATA Host-Controller configuration.
There is, as it happens, also a failed SATA hard drive on Channel 2. In the example above it simply gets ignored by the BIOS setup. In other systems or other types of failure this could have prevented the PC from even booting-up. Because the drive is not seen by the BIOS there is no hope of recovering any data from it on this PC for as long as that situation persists. It is always worth changing the BIOS setting to Auto to see if this can identify a drive though that didn't work in this case. In fact it is known that its jumpers are correct and that its cables and connections and power supply are all good. This was confirmed by swapping its cables and by seeing that it did not spin up nor be recognised by another PC.
If you are not familiar with the BIOS setup and make and save changes that prevent the PC from rebooting then you should re-enter the BIOS setup and choose the FailSafe Defaults Option. Note that there is "always" a key that needs to be pressed in order to save any changes made while inside the Setup facility. The settings can also be reset by a special jumper on some motherboards or by removing the power from the PC and then take out the small watch-like CMOS battery for 10-15 mins having also pressed the main power button to discharge the circuits. When all power has drained from the CMOS chip all its BIOS settings are reset to their defaults. The date, in particular, should be reset after this because an incorrect date can actually prevent an otherwise successful boot-up into Windows.
Inaccessible Operating System
One of two scenarios most commonly occurs. Either the system does not complete the "POST" (in which case a BareBonesBoot may be required because of the existence of faulty hardware) or the operating system starts to load but then fails with a blank/black screen or some failure message. Write down exactly any such messages before searching the web or otherwise asking for help. Googling exact error messages will very often give you the answer or point you in the right direction.
It may be possible to access an operating system that is just failing to load either by fixing a corrupt boot process or by some sort of reinstallation. An example of the latter is a repair installation of Windows XP. With any problematic Windows installation it is always worth seeing if you can gain access using "Safe Mode" or other related boot option such as "Last Known Good" configuration.
Safe Mode is of particular value if drivers have been corrupted or in systems not loading because of viruses or other malware. To access Safe Mode, the F8 key needs to be depressed (or intermittently depressed and released) immediately after the PC completes its initial startup routine. Then select the relevant option and don't be surprised by the bland appearance of the display if this manages to "get you in". Safe mode can also be invoked under Windows 2000/XP/2003 by adding /safeboot:minimal to the relevant line in boot.ini. This boot.ini option can be set automatically in Windows by running msconfig or if unable to boot to Windows then the file can be directly edited by booting to BiNG's [Partition Work]'s [Properties] for the highlighted partition and then choose the [Edit File] button. This should work on both FAT and NTFS partitions.
Extraneous Access of Data
If you are in a hurry to get at your data and don't want to be bothered or cannot repair what has befallen you then you can try to access it in one of two basic ways.
Access using another Operating System
We use the term Operating System (OS) a bit loosely here. A full blown reinstallation of an OS may well be a feasible option by installing one "in parallel" into a Windows2 folder in an existing windows partition or, as a "dual boot", into another partition - even on another hard drive. In the main we suggest using any one of a number of Utility Boot CDs. We particularly advocate the use of a Knoppix Live CD to backup/access/recover your data since it tends to use some of the best hardware detection.
Remove the Hard Drive and Access it from another PC
Domestic/SOHO PC Motherboards normally have IDE and/or SATA slots/channels on them and so as long as there is a slot available for the hard drive in question it should usually be easy enough to physically transfer a hard drive into another functional PC and then access the transferred hard drive from the host operating system. An alternative to "slaving" it inside in this manner is to grab an external hard drive enclosure or converter cable and then attach the hard drive via a cable (most commonly a USB cable) to the other PC. IDE drives should nearly always be jumpered as Master with such enclosures/converters.
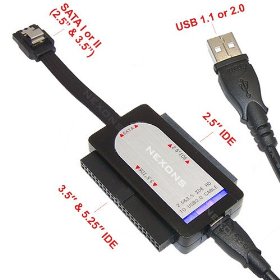
There are enclosures and converters for both 2.5" laptop and 3.5/5.25" desktop hard drives. They are usually made for either an IDE or a SATA interface. You can see the differences between 2.5" and 3.5" IDE connections on another of our pages here. There are even compound converters that will attach just about any sort of drive to a USB port on a PC and other converters that can allow you to attach an IDE drive to a SATA port and vice versa. The Nexons converter (which comes with a power adaptor and is shown immediately below) is just one such compound converter currently available from Amazon and elsewhere.
Hard drives in both laptops and desktops are not, generally speaking, the hardest hardware items to add or remove from a PC. Read your PC's manual or search for it on-line for more specifics. Alternatively ask at a forum such as the PCGuide for additional help if you are still having problems or are unsure about how to proceed. Once the hardware has been set-up there are still however a few things ("gotchas") to be particularly aware of and to watch out for:-
"Gotchas"
- NTFS v FAT. If the partition to be accessed is an NTFS formatted partition then the OS (Operating System) used to access it needs to be an NT-based one such as Windows NT or 2000 or XP or Vista or else a modern Linux distro. Native DOS or DOS based versions of Windows up to Windows Millenium cannot natively see NTFS partitions at all though NTFS4DOS can help to overcome this limitation. Any NT-based OS (even installed on FAT) can read NTFS natively.
- Jumpers. If the hard drive is attached to an IDE ribbon cable then it and any device already on the same cable must both be appropriately jumpered. Occasionally fast 3.0 SATA drives need to be jumpered to 1.5 speed for older motherboards or PCI cards. If you can't work out the correct configurations from looking at the drive itself try its maker's web site for support.
- SATA as IDE. If the hard drive is attached to a SATA slot then the BIOS setup should be accessed to see in what mode it is to be configured. If it is to be configured as a SATA/SCSI/RAID drive then the appropriate drivers will need to be installed in the host operating system. If configured in IDE-emulation mode then no special drivers should be necessary.
- Ownership. If the data requires access from a different (not the original) NT-based installation of Windows it is not uncommon to get an "Access Denied" message when the original folders from the other installation (particularly folders in the 'Documents and Settings' area) are accessed. In these circumstances it may be necessary to Take Ownership of them or else use a version of Linux to obtain access.
- Large HDD. Drives larger than 128/137 gig will only be capable of being seen in their entirety by 48bit LBA capable Operating Systems and Hardware (Motherboards/Enclosures/PCI-Cards).
- Dynamic Drive Overlay. DDO is software (usually installed by a hard drive makers' utilities) installed onto a "large" hard drive such that even though the motherboard's BIOS cannot see all of a "large drive" the correct large values are loaded into the main memory by this code that runs as soon as the MBR is read by the unwary BIOS. Such software may need to be removed or replaced if it interferes with normal access and recognition.
- ATA Password Protection. It is possible for a whole hard drive to have a password set in a "host protected area" of the drive. This is most commonly seen on some laptops and X-boxes. Such drives cannot be normally accessed from outside their own machine and is yet another reason to always keep data backed-up. We know of no free DIY way to overcome this and, without proof of ownership, it is dubious whether any further help should be offered.
Missing Data
Files, folders and whole partitions can go missing. If your hard drive is still functional and the "missing" data has not been overwritten by on-going access of the operating system or by running file system utilities or by copying/moving files and folders or by a virus then the chances of full data recovery are high. The reason for this is that deletion of data (even by full formatting of partitions) does not automatically overwrite existing data. Files (particularly files inside folders) are simply marked as deleted and then just ignored rather than have their data 'scrubbed clean'. This data persists until the space is needed and the data then gets overwritten making recovery unlikely, impossible or incomplete. Don't forget to check your Recycle Bin to see if it has been emptied and to consider changing your folder options to make visible all hidden files.
Deleted (and otherwise inaccessible) Files
There exist a large number of DIY recovery programs - a lot of which can be expensive, not that easy to use and even pretty useless. Maybe try FreeUndelete as a simple free utility. Otherwise GetDataBack (for FAT or NTFS as appropriate) has been the one over-riding utility that we have seen to repeatedly have great success. It is free to download and use to scan your partitions so that you can see if your data can be found. A step-by-step guide in pdf format is available from the website's homepage. After that you can purchase the software if you want to recover files in batches or else open each individual file in an appropriate application and then save the files back to disk, one-by-one, for free. If you cannot find an application for the purpose remember that hex editors (such as the freeware HXD) can normally open and then allow you to save any type of file.
Please do not run such applications from the same partition from which your data has gone missing. If you are in a hurry to use your hard drive (or simply for backup reasons) a good approach is to make a literal cloned image file of the partition (or a copy of the partition) somewhere else, such as onto an external hard drive. GetDataBack can actually create such a file for you as can a number of partitioning and imaging applications. You can then use that file or the copied partition as the source for the recovery or as a backup if you want to experiment with the original. Otherwise access the partition from another PC altogether or from a utility CD. There are, for example, plug-ins for the GetDataBack utilities that can be added to a BartPE CD. We have a page showing how to add a plug-in (TinyHexer, another freeware hex editor, in the actual example) to the CD but the same basic procedure would be used for the GetDataBack plug-ins. In fact both apps can be useful in conjunction on a BartPE disk.
Missing Partitions
There is even less data overwritten when partitions are "deleted" than when files are. Writing zeroes or wiping a hard drive or any of its partitions is a different matter though this is seldom done routinely. All that gets changed are a few bytes in the partition tables of the Master Boot Record (MBR) for primary partitions and in the daisy-chain of Extended Partition Boot Records (EPBRs) for any Logical Partitions.
Such tables can nearly always be recreated by a utility that will scan the drive for boot sectors and use the information to rewrite the data in the partition tables. The TestDisk utility is widely-used and successful at doing this job as is our own favourite - BootItNG.
Reformatted Partitions
Formatting an existing partition can result in the over-writing of a certain amount of data but, in the main, the amounts overwritten are less than one might imagine - particularly if the same file system is used. A partition of the same type just has its metatdata (for example the FAT tables) rewritten and all files on the partition marked as deleted. A full format does just the same thing as a quick format but also checks the remaining surface for errors. Data recovery follows the same principles as when files have simply been deleted. Files in the root of a FAT drive (not within any folder) are more likely to go missing because they are not within the folder hierachy/indexing, which runs in parallel to and not dependent on the FAT tables.
Formatting or deleting partitions is thus unlikely to cause major mischief but, of course, installing an operating system or reinstating a partition from a recovery image would be very destructive to earlier stored data.
Corrupt Data
Data generally becomes corrupt in one of two ways. (1) The file system can be corrupted - usually when metadata is damaged so that the data it normally references becomes somehow disassociated. Typically indexes can no longer find the data that they have listed in them. The data may well be there but not findable by the usual methods unless such errors can be corrected and (2) Bad sectors can form on the hard drive itself thus limiting file in-out to those specific areas. Some bad sectors are writable but not readable (the worst scenario) others are readable but no longer writable and some may be totally bad. Bad sectors involving a particular file's data are thus likely to leave "holes" in the file. Those bad sectors that involve metadata are just one of the causes of file system corruption. Critical metadata affected by bad sectors, such as any boot sectors or the master file table on NTFS volumes, can make certain data very difficult to recover. Boot sector involvement alone is likely to create an unbootable or "unrecognisable" volume. Involvement of the FAT tables (even though there is normally a full copy of the primary table) can certainly hinder good recovery - particularly on very fragmented partitions. This is because each entry links to the next entry in an often disassociated daisy-chain until the end of the file is reached; a break in the daisy-chain breaks-up the whole map of the file's data.
Corrupt File System or Partition
Put very, very simply, files and their data are referenced in three main ways: (1) Metadata information about the files themselves is maintained as attributes such as file size, name, owner and date of creation, (2) Files are also referenced/indexed within a folder hierachy such that an operating system (and hence its users) can find the files they need and (3) The files' underlying data is stored (in either a contiguous or fragmented manner) on "mapped locations within a logical volume or partition.
When these areas become disassociated an OS may not load at all or it may load and then ultimately fail at some later point in time or a non-system partition may be inaccessible or apparently unformatted. If there is no vital data on the drive and the most important thing is to get the system functional again then disk-checking utilities such as scandisk and chkdsk may well be able to make the necessary changes. It may be possible to run these from within the operating system or from a boot CD such as a BartPE disk. Be warned that if these are run in any other than read only fashion the changes they make can make data recovery itself less rather than more likely to be successful. If data recovery is needed then backup the whole partition as a sector-based image or copy before you run such utilities with write options. Running chkdsk /f is just such a command. The /f switch is to allow both checks as well as an attempt to repair a faulty file system.
Defragmenting a corrupt file system will only ever make the situation worse. Many users attempt to defragment believing it will help repair things. That is not the function of defragmentation, which is only to improve file in-out performance and thus the speed of certain operations. Never defragment unless you are sure that the file system is OK and never defragment as a "repairing option".
In short, don't (initially anyway) try to repair a file system on which you have missing or inaccessible data! Only access it from an independent operating system and run premiere recovery software such as GetDataBack, which can use its knowledge of file systems in combination with clever algorithms to attempt to reconstuct one or more virtual file and folder hierachies of missing or disassociated data from which recovery can then, hopefully, be made.
Bad Sectors
Once hard drive bad sectors start "appearing" in any numbers it is time to consider a new hard drive. A modern hard drive will attempt to isolate such sectors by mapping them in a special inaccessible area and thus exclude them from ever being seen by operating systems. Once this area has been filled it is likely that the OS will begin to be increasingly affected since the sectors can no longer be hidden from the OS. At the start (and particularly with sectors that just have write failures) the OS can copy the data elsewhere and itself isolate the bad sectors from being further accessed by the operating system. Eventually inaccessibily, crashes and data loss may all ensue.
One particular effect of such a failing drive is that disk access begins to slow down. One of the reasons for this is that if a sector cannot be accessed normally the OS attempts, for a considerable number of retries, to see if the file i/o can be accomplished and to attempt repair and sequestration of the area. As the number of such bad sectors increases, the file system and the main metadata structures begin to be affected to the point when all access may become impossible. It may be impossible both because of corrupt metadata (such as an inaccessible boot sector) or because it is just taking too long to access the data so that everything just "times out".
One approach to access data on a drive made inaccessible because of bad sectors, is to clone it to another good hard drive. If successful the resultant copy will of course have some holes in it but because it holds no bad sectors it should then be accessible either normally or by using data recovery utilities. The Linux program dd_rescue can be invaluable in achieving this end and we have already described using it to recover an otherwise inaccessible drive using Knoppix.
Bad sectors can be looked for and the health of a hard drive checked using its manufacturer's own diagnostic utility (mostly downloadable from their websites) or with the generic utility HDTune run from within an appropriate OS. Some OEM PCs (such as most Dell machines) ship with the ability to run such diagnostics directly from a boot menu. The Windows utility chkdsk was mentioned earlier with respect to file system checking. It can also be run with the /r switch (chkdsk X: /r from a command prompt and where X: is the drive in question) in which case after the file system has been checked the full disk surface is scanned for errors. This is equivalent to running a full versus a quick format since the former also checks the surface of the disk for errors.
Some Notes
Hard Drive Makers' Diagnostic Utilities and Hard Drive Tools.
A list of these can be found on another page.
WinHex
WinHex is a disk, file and memory hex editor of the finest quality capable of forensic examination of ones hard drive. It can be downloaded and used for free but must be purchased to invoke most of its write capabilities. It is not the easiest utility to use and it might not find (or easily find) data that GetDataBack, as already mentioned, might well find in a more straightforward way for the user because, although it can examine structures in great detail, it is not a specific data recovery utility. We use it a lot and would never have really got to grips with what goes on in file systems without its help.
Metadata
Metadata, put simply, is data about data. In the context of file systems and hard drive structures there are areas of all boot sectors that contain metadata such as partition tables and the BIOS Parameters Block. Within partitions, the FAT tables and the directory tree can be considered to be metadata as can a number of specific (invisible by normal means) metadata files - in particular the $MFT or Master File Table.
System -vs- Boot Volume/Partition
We mirror the MS nomenclature, whereby the System Volume is the "Active Partition" from which booting takes place. It is the partition that holds the boot files such as IO.SYS or BOOT.INI and is nearly always (though not ubiquitously) the C: drive. The Boot Volume is the partition to which booting completes and which contains the Windows folder. They are often one and the same partition but do not need to be and seldom are in multiboot systems.