TinyHexer and BartPE
Quick Intro: A Live CD (one
that runs an operating system) and one capable of running Windows programs
is a real boon. A BartPE CD is just such a bootable CD. We hope to demonstrate
that it is not that hard to create one. In doing so we also want to
show how to add programs to the CD. We have chosen TinyHexer as our
first example because it can be a very useful and powerful tool and is
the only disk editor that we have come across that can run from a
GUI (graphical user interface) on a boot CD. A list of pre-compiled plug-ins is included in an appendix at the bottom of this page.
We also hope to be able to help demystify the rather esoteric nature of hex-editing by outlining some of its basics along with a few examples using TinyHexer. BartPE Live CDs are especially useful for all sorts of troubleshooting and recovery purposes, notably when one is unable to normally access a hard drive's file system. As with WinXP, basic USB2 support is included. Autodetection of inserted USB drives can be problematic but we generally have had no difficulty accessing them if they are attached to the PC prior to boot-up.
NB: If your hard drives contain DDO (also known as Software Translation) and particularly if you are using RAID or SCSI or NT Dynamic Disks then please read the specific cautions1 in the footnotes. (The importance of appropriate back-up can never be over-stressed).
Outline of these two applications
TinyHexer is a freeware Disk Hex-Editor that runs from a Windows
Interface. It is supported under Windows 2000/XP/PE/2003 and, as long
as it is run with admin status2, has
functioned, without problems, in our hands under Vista. A BartPE Live CD has become the paradigm for a Windows operating system running from a CD. It is a de facto, though cut down version, of Windows XP. This pairing is the best (in fact the only) combination that we have found for directly editing hard drives from a Windows graphical interface running from a Live CD. Nor do we know of any equivalent graphical interface that will run from a Live Linux CD , though some command line utilities
do exist. For those that need to do such editing this is a real
marriage of convenience. There is a legal pre-requisite that you have a
Windows XP or 2003 installation CD (and its licence) in order to create
a BartPE CD. Unlike its hard drive mother operating system, no Windows
activation is however required and the CD will function on a wide range
of hardware - your licence agreement allowing this of course.
BartPE Plug-Ins
Plug-Ins allow additional programs, to those already preconfigured (see Appendix), to be added to a Bart PE CD. These additions are mostly Preinstalled into the Environment from a specially prepared or provided .cab file that contains all the necessary files for the supported application. When the [Add] button is used during a build, one just points it to where the .cab file has been stored and it should then simply be unpacked into the Bart plugins folder. Some provide unpacked plug-ins which you must manually copy into the Bart plugins folder; for example the one for TBU's CopyWipe program. Each unpacked plugin should contain one .htm file with instructions on how it should be used.
A number of default plug-ins will have already been setup when a BartPE .iso image file is compiled. Many may be downloaded from their respective websites. The TinyHexer plug-in is no longer available on the mirkes.de website but can be downloaded from Megaupload. There is a nag wait if you are not a member. We suggest you keep any such new third party plug-in .cab files in a bartcabs (or whatever else you call it) folder somewhere handy, which should make it easy to find them later-on when customising the PE build. [For those needing recovery software we would particularly point out that there are a number of very useful plug-in .cab files available at the bottom of the runtime.org download page]. We ourselves have compiled a pqutils.cab plugin for grabbing HDD information outlined at Read/Edit Hard Drive Details using PartitionInfo and PTEdit.
The TinyHexer .cab file contains the small version of the application which runs quite OK in most of the NT-based OSes (including a PE CD). There is also a medium version as well as a full version that will give one more options when used under a normal Windows installation. We recommend the full version (or other hex editors3) for doing this but do note that, even though they are still available from the site, the creator, as stated in his blog, has stopped developing software.
Installing the BartPE Builder
First of all have your Windows XP (or Windows 2003) CD or
installation files and any BartPE .cab files you intend to compile at
the ready. There are a few different approaches but we recommend you
download and run the self-installing pebuilder3110a.exe from a
mirror of your choice. If you don't have your plugins or Windows
installation files at the ready just exit the intitial install and
restart the PE Builder when ready.
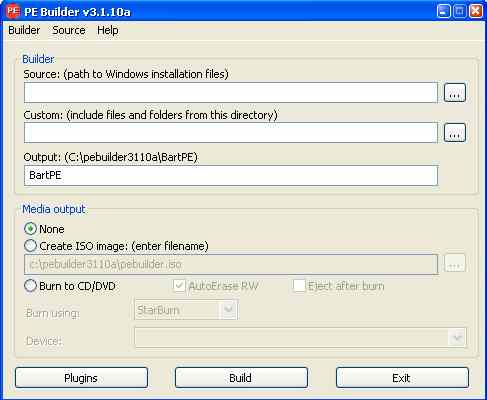 Fig 1.
When you have entered the source to the Windows Installation files
(say D: for a CD in the D: drive) you can hit the Plugins button. [Hint; if you want to prevent a CD from
auto-running when it is
inserted hold down the Shift Key while the CD is inserted and has had
time to be recognised].
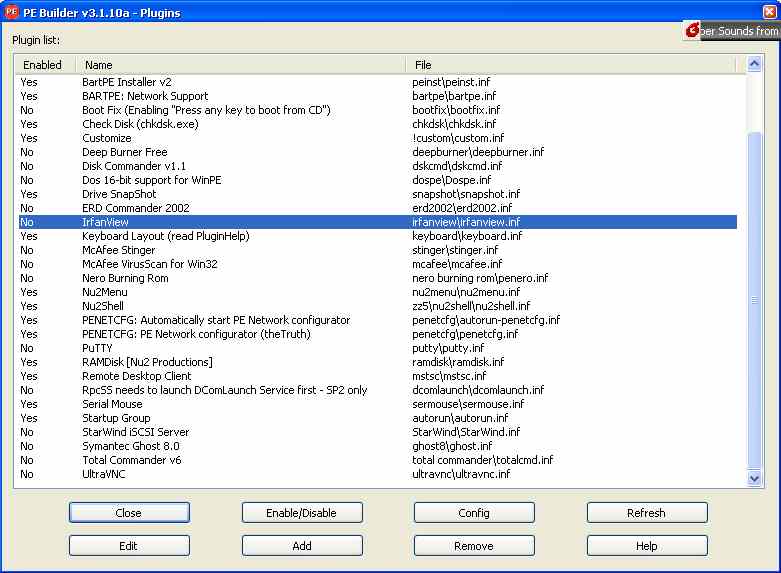 Fig 2.
- The Plugins dialog box will let you [Add] 3rd Party Plugins and [Enable/Disable] them and so on. Most of the pre-configured plugins that are not Enabled will require you to modify their folder content or download any executables that were not included in the package. This is often because they are not freeware applications and even though the rest of the plug-in has been pre-configured for you by Bart. We suggest that, for starters, you leave everything as is and just add the TinyHexer plugin (or no extra plugin or just one different plugin) to keep things simple at first. [Close] the Plugins dialog box (Fig 2) and then use [Build] from the Builder dialog box (Fig 1).
- We prefer to choose "Create ISO image" and let the build compile the iso file, which we then later burn to a blank CDR/CDRW using burncdcc.zip. BurnCDcc is our own preferred iso-burning software though there is, of course, nothing to stop you choosing to burn directly using Bart's embedded software options or of using your own preferred software. Just ensure you know the difference between burning and copying an image file to a CD. Both the .iso and a .log file are created in the same folder that contains the pebuilder.exe file. When the build begins there will be a longish, line by line display of what is being done. Any warnings can usually be ignored and looked at later in the log file if so desired.
- There are other instructions on the BartPE site including Online Help and FAQs. Keep things simple to start with and you should have little difficulty in creating this very usful bit of kit for your toolbox. As your proficiecy grows you will be able to learn a wide range of ways of modifying such a CD by editing the content of the sub-folders in the PE builder's pre-installation folder. There is also lots on the web about doing all of this and here, as ever, Google is likely to be your friend.
- If you design your own plug-in and want to pack it into a .cab file for distribution or whatever; first download the self-extracting package from Microsoft and use its cabarc.exe file. Put all the files to be included in a temp folder along with cabarc.exe and then from a command prompt use the syntax:
cabarc n utilityname.cab file1.xxx file2.xxx file3.xxx ...
There are more instructions in the MS package.
Basic Introduction to 'Hex'
When you fire-up TinyHexer (from any environment) and open a disk or a partition or a file, an internal window should be opened/loaded and have three main sections within it. More than one item (with an internal window) may be open simultaneously but try to have just one open at a time to keep things simple, while learning how to use the application.
- On the left are the offsets. The absolute positions, or addresses, of sectors and/or bytes in the loaded item. In TinyHexer these are shown in hexadecimal by default but, if desired, this can be changed from the View Menu's "Editor Offset Format" setting. The column can be hidden by choosing none or the default changed to decimal or to octal. Getting used to the using the hex values has certain advantages (the end of a sector may be more easily identifed for example) and should become obvious over time.If you are new to all of this using decimal to locate where you are may well be preferable.
- In the middle column is some hexadecimal code (a 16-character notation also known simply as 'hex') that uses the characters from 0 to 9 plus those from A to F. On those occasions when it is not obvious that code is hexadecimal there are, in widespread use, two common ways of trying to avoid confusion with normal decimal notation. Thus prefixing with 0x (as in 0x21) or suffixing with h (as in 21h) should tell you that the 21 referred to is hex and not decimal; 21h = 0x21 = 33. [Such calculation translations can be done easily enough using the Windows Calculator (in Scientific Mode from its View Menu). Just enter calc into the Windows run box or open it from Accessories in the BartPE start menus. Each byte has 162 = 256 different possible values and is represented by a pair of hex characters (each character representing a separate 'nybble')]. Each row typically contains 0x10 (16) pairs of hex characters, 00 through 0F, though not all hex editors follow this principle.
- On the right are ASCII text characters. These are the representations, in "text", of each corresponding pair of hex characters in the main body of data. In Fig 3 one can see that the code at offset 0x2B is 0xCD (205) which is the ASCII code for the character Í. Non-printing characters, such as a Tab or a Backspace, are shown as a dot and this is normally the case if the hexadecimal byte's value is less than or equal to 0x1F (31). A blank character would normally be directly paired with the value 0x20 (32), which is the ASCII code for a space.
One can select an area of code by highlighting it in either the hex or the text area. Its matching areas get highlighted at the same time. This text will usually be completely garbled when it represents binary code (such as assembly code or bitmap images) but readable as human text when it represents textual programming or text-based files. Editing can be done either by entering/changing hex values in the central area or by entering/changing text in the right hand area.
One potentially very confusing area about any "block representation" of data (as in disks and drives and RAM) is to do with the way the offsets are referenced. It is normal for the first byte or the first sector of a range to have the value of 0 and not that of 1. Thus the first sector of a hard drive is sector 0 (0x00); (it is common to write a double zero to indicate both of a byte's nybbles and this can become very important when "endian-ness" comes into play). The first 63 (or 0x3F) sectors, which make up track 0, are sectors 0 through 62 and not 1 through 63. The last LBA sector address of a disk with 3,000,000 sectors is 2,999,999. The last byte's offset of sector 0 is similarly 0x1FF (511) and not 0x200 (512). And so on and so on. This all may take a bit of getting used-to but can be critical in understanding the geometry, when moving around block data and particularly when calculating and editing actual data. Another way that can help to fix this concept in the mind is to note that when we are 1 year old we are in our 2nd year or, if you prefer, we are "0 years old" when in our 1st year.
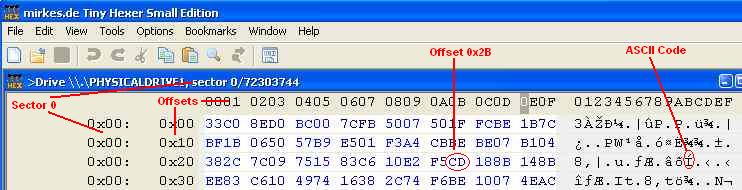 Fig 3.
Another area that is ready made for confusion is 'endian-ness'. A hex editor's display shows the bytes in the same physical sequence that they are represented on disk. However when more than one byte is read by the system (and even more confusingly when less than a whole byte is included, as in FAT12 allocation tables and with partition table CHS values) the bytes will actually be read in reverse order in little endian systems such as used by a PC's CPU. Whole single bytes are usually straighforward enough but two bytes (a hex word) or four bytes (a hex d-word) become manifestly different. As an example, the sector signature (the last two bytes of a boot sector) are 0x55 and 0xAA respectively. If these are read as a word and not as two separate bytes then the mathematical value becomes 0xAA55 (43605) and not 0x55AA (21930) if little endian. What is perhaps instructive and a bit of fun is to convert the 0xAA55 value to binary when it becomes 1010101001010101; is it a co-incidental pallindrome? Examples of big endian systems are a motorola CPU and the TCP/IP packets in networking. Don't let the specifics worry you for the moment - we only include it for the purpose of more general understanding. It can, for example, explain why some Windows registry values are not what you might expect them to be.
Getting Started with TinyHexer/BartPE
We will assume you have created a basic BartPE CD with just the TinyHexer plug-in added to it. When one boots to the CD it is initially a bit like booting a normal Windows XP system though possibly a bit faster or a bit slower than usual. Suggest you simply ignore any prompts for Network Support and then from GO >> Programs >> mirkes.de Tiny Hex Editor (Fig 4). There will be no Windows Explorer/My Computer but the A43 File Management Utility should be capable of navigating your file system and so forth as the need arises.
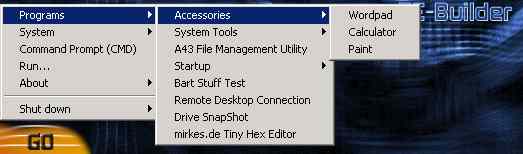 Fig 4.
Since we are, initially at least, going to address Disk Editing you could go to the TinyHexer "File" menu and choose "Disk" and then "Open Drive". You should get a dialog box like that in Fig 5.
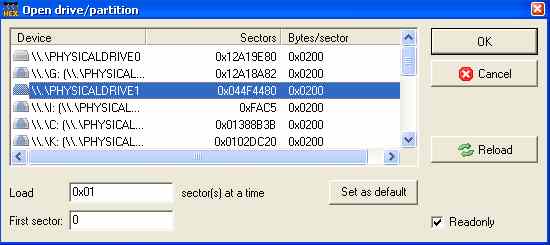 Fig 5.
Files, Drives and Partitions can all be opened into a display window (as in Fig 3) from the main menubar's "File" menu. Files are opened as normal from its "Open" sub-menu and Drives/Partitions from its "Disk" sub-menu. If the inset window is maximized then its description appears in the main title bar - otherwise each window has the description in its own title bar. The bottom left of the status bar in the application's main window always shows two values. The size (in hex) of the active window's loaded data and next to it the absolute position (also in hex) of the cursor. Files are opened in their entirity but block devices (by default) with just one sector at a time. If you want to open a larger block of data from a drive, say the whole of Track 0, then you need to specify that the correct number of sectors are loaded. For a full track that would be 63 (0x3F) sectors.
You can also create a brand new file and enter either hex or text into it before saving it with a name (file extension optional) of your choice. When block devices (essentially all drives) have their hex edited the changes show-up straightaway with different coloured text but are not commited to disk until you demand this or agree to save the changes when prompted. Just remember there is no undo after you have agreed to write the changes. Edited text, with the changed colouration, can however be undone prior to writing/saving the definitive changes. A blank floppy diskette is a good disk to load-up and to then experiment with in order to gain some familiarity with the software, without endangering your main system.
Text files opened and edited in text editors such as notepad should never be particularly problematic but binary files opened in such applications can be because they can unmask hidden EOF (end of file) and other markers. Such binary files are best edited using a hex editor because "what you will see is what you will get". Seeing "what you will get" is one of the main reasons that we like using a graphical and not a command line based hex editor; you can see the changes before you commit to them.
Example 1: Back-up the MBR to a file.
In order to access the MBR you must (as in Fig 5) choose a PHYSICAL DRIVE and not a partition. A physical drive will begin with Sector 0 of the whole hard drive but if you chose a partition it would start with the first sector of the partition, which is a PBS (partition boot sector) and not an MBR (master boot record). You can check the Readonly box if you want to ensure that you cannot directly write chunks of data to the disk. You should however still be able to access any accessible partitions via their file systems. Even if the Readonly box is unchecked you should get prompted once again before any changes do actually get written to the disk - so we always leave it unchecked. You must leave it unchecked if you want to make a copy of the sector by writing the copy directly to another part of a drive (or whenever you want to edit any disk sectors directly).
Let us say you wanted to make a back-up of the MBR. Ensure you leave "Load 0x01 sectors at a time" and the "First Sector 0" values alone. Then hit OK to open the editing window. If you had checked ReadOnly you must next "Select All" from the Edit Menu and then "Save Selection" from the File Menu. You can also do this with Readonly unchecked. If Readonly is unchecked you can alternatively simply select "Save As" from the File Menu to save the whole of the already loaded first sector to a file somewhere of your choosing. Use the drop down menu at the top of the Save dialog box to navigate to where you want the file stored and give it any meaningful name of your choosing. The resultant file (say called mbrdisk1.bin or mbrmaxtor.bin) should have a file size of exactly 512 bytes.
Example 2: Back-up the MBR to a disk sector.
Start off just as with Example 1 and ensure that Readonly is unchecked. "Select All" from the Edit Menu and then from the same Menu choose "Copy". You now have the MBR on the clipboard so the next thing is to find a good sector on which to store the copy as a backup location. You might like to change the offset display to decimal rather than hexadecimal - that is up to you. You would do this from the "View Menu >> Editor Offset Format".
There are two sectors that are generally OK to use. Any sector might do of course but you dont later on want to overwrite anything of significance nor have your backup overwritten by something else. The last sector of Track 0 (sector 62) and the very last sector of the drive (the total sectors minus 1) are generally the best places. You can jump to the very last sector from the "File Menu >> Disk >> Load Last Sector" or you could move sector-by-sector to Sector 62 by holding down the <Shift> key and then toggling the <F7> and <F8> keys. Check that all 512 bytes of the chosen sector are zeros or are all 0xF6; if not then desist. Check that you have only one sector loaded; if not then desist. Check that your position is where you want to be; if not then desist. You can then choose "Select All" and then choose "Paste" (though often just choosing "Paste" is enough). The zeros should now be replaced by the same code that was on the MBR but these changes are not yet commited. When you next try to move sectors or close TinyHexer or if you go to the "File Menu >> Disk >> Write Changes" you should be prompted to write the changes to disk along with a scary warning. At that point the changes will be commited if you say Yes. At that point you are on your own.
The advantage of using the last sector as opposed to sector 62 is that if the MBR is corrupt there is a reasonably good chance that the adjacent area will also be bad and this could have rubbed out the backed-up data on the nearby sector 62. The disadvantage is really only that you should not use the last sector if you have NT-dynamic disks or any RAID arrays in place. This is because both use the end of the drive for their databases. The very end of the drive is nearly always outside any partitions, since it would be pure coincidence if the final partition's cylinder boundary coincided with the end of the hard drive. It can be handy to have the backup on the hard drive like this but it is always one step safer to have it stored as a 512 byte file on some removable medium.
Example 3: Restoring an MBR.
If the backup is on a file you must first open that file. An MBR backup should be 512 (0x200) bytes in size so the value of 0x200 should show in the bottom left of the status bar. Then from the "Edit" menu choose "Select All" and then from the same menu choose "Copy". The data should now be on the clipboard so you can close the window and open the correct Disk, whose MBR you want to restore, just as described at the start of Example 1. If the defaults were left alone just the first sector, the MBR, will have been loaded. From the "Edit" menu choose "Select All" and then "Paste" the clipboard contents. Now is the moment of truth. Double-check that you have chosen the correct Disk and that you have pasted the backed-up data to the correct Sector. You can scroll around, etc, etc, to see what is where. When you are completely happy go to the "File" menu and on to the "Disk" sub-menu and choose Write Changes. Agree to do this and the backup should be restored.
If you are backing up from a known back-up on a sector then it is basically the same. You would just need to navigate to the backup sector and copy it to clipboard. Go to the first sector of the relevant Disk and choose to paste the clipboard contents. Write the changes and agree to the warning prompt.
Example 4: Changing the Disk Signature or the Active Partition.
In the following diagram, the last 72 bytes of an MBR, (which incidentally the NT command fixmbr does not over-write so long as the last two bytes of the sector are 0x55 and 0xAA) the Disk Signature is displayed in red text and the four partition table entries have four different coloured backgrounds. If the first byte of the sixteen bytes making up each partition table has the value 0x80 then that is the active partition. Only one primary partition (excluding any extended partition) should be marked as active. In this example the first byte of the second partition table (blue background) is thus marked as the active partition.
Offset
0 1 2 3 4 5 6 7
8 9 A B C D E F
0000001B0
19 BB A2 BF 00 00 00 01
0000001C0
01 00 04 FE 3F 03
3F 00 00 00 C5 FA 00 00 80 00
0000001D0
01 04 07 FE FF FF 04
FB 00 00 3B 8B 38 01 00 00
0000001E0
C1 FF 0F FE FF FF
3F 86 39 01 35 B6 12 02 00 00
0000001F0
C1 FF 07 FE FF FF
74 3C 4C 03 20 DC 02 01 55 AA
The "soft" disk signature; 19 BB A2 BF (written in hex in red at offsets 0x01B8 through 0x01BB) can be changed easily enough. Just open the relevant Disk and scroll down to that position. Put the cursor at 0x01BB and confirm from the status bar that you have located the correct spot. It's hardly worth saving these four bytes to a file - we just write the four pairs of hex down as an eight-character string if we want to keep the value backed-up. To edit to a new signature of your choice simply enter the values you want and then from the "File -> Disk" Menu "Write the changes" just as in the previous examples.
The partition tables' active partition (the table's byte at offset E in each line) is also pretty straightforward to edit as is the type of partition format (the byte at offset 2 in each line). The types shown here are 04 (FAT16 >32MB), 07 (NTFS) ,0F (ExtendedX) and 07 (NTFS) respectively. We actually recommend that you use other utilities (such as PTedit by PowerQuest now Symantec) because they make the translation of the bytes into more meaningful values for us humans to better comprehend and more easy to edit correctly. Changing the format type, by the way, does nothing to actually format the partition. Most types can however be "hidden" by giving the first nybble the value 1 instead of 0. Thus 1F becomes a hidden NTFS partition.
The very useful PowerQuest/Symantec tools PTedit and PartitionInfo can be freely downloaded from the public FTP folder. One particular value of PTedit is that one can just as easily see and edit any logical partitions as one can the primary partitions. You will need to download the correct version for your operating system (DOS or Windows or NT-based Windows). We have also put together a pqutils.cab BartPE Plugin so that you can easily add these two programs to your BartPE CD.
Example 5: Quickly "Zero" a Hard Drive.
A brand new unpartitioned hard drive is normally completely full of zero bytes. However, if you want to "effectively" re-zero a drive, because you are in a hurry, then all you need to do is to replace the MBR code with zeros. What could be easier. Open the relevant Drive and put the cursor at the very first byte and hold down the 0 key until all 512 bytes are full. Write the changes and you have an effectively zeroed hard drive. Most software will not look beyond the MBR and so will behave just as if it is a brand new drive. Less complete, but quicker, is to just zero the 64 bytes that comprise the four partition tables. This is equivalent to deleting all paritions on the drive. If, on the other hand, you want to be even more sure then zero the first 64 sectors (the whole of Track 0's 63 sectors plus the first sector of Track 1). Zeroing all of Track 0 (which utilities such as BootIt-NG call the EMBR or extended master boot record) will fool just about all utilities and boot sector viruses. A proper full zeroing of a drive can have other benefits (such as re-writing the bad sector map or of ensuring that data retrieval is most most unlikely to ever succeed) but is really best done using the hard drive maker's own diagnostic utility. Zeroing the first sector or track may be reversible but complicated but zeroing a whole drive will destroy all the data on it.
Footnotes:
1. There are a couple of areas that one should be particularly wary about when using a disk editor as well as when booting to any NT-based or Linux operating system (from a hard drive or from a live CD).
- Any hard drives containing DDO can behave quite abnormally when accessed from other than the hard drive. Such DDO overlaid drives behave in a proprietary fashion at the best of times. DDO was once commonly used on motherboards with older BIOSes and to which hard drives beyond the capacity of those BIOSes were attached in order to overcome those limitations. If you have a modern system that natively supports drives larger than 128GiB (137GB) then this shouldn't be an issue, since there would never have been any reason to install such overlay.
- After the BIOS has chosen a boot device, both Linux and the NT-based OSes can poll the hardware for themselves. If the incorrect drivers have not been installed along with the OS then the OS may not see any such RAID/SATA/SCSI drives or, potentially more destructive, may see all the drives which had previously been incorporated into the sole array entity. In this situation anything written to any part of a drive can break an associated array. If you are using RAID then do take particular care and do install the correct drivers from a floppy diskette using the F6 option at the very start of the PE start-up either if such hard drives are missing or if they appear to be duplicated. If you are not using RAID nor NT Dynamic Disks then these adverse affects should not be an issue - though you may well need the drivers at startup in order to be able to access all the hard drives in the system.
Don't go down these avenues without first having any vital data backed-up offline beforehand. That, of course, should be a given all the time. However this is too seldom done - to the great profit and delight of professional recovery firms..
2. To run a program with admin status under Windows Vista simply right click on the application's shortcut icon (instead of double-clicking on it as normal to open it) and then choose "Run with Administrator Status".
3. Alternative Windows Disk Hex Editors:
- X-WaysWinHex This brilliant software is shareware but you can still do a great deal with it (bar most writing operations) without purchasing it.
- mh-nexus HxD Freeware that comes recommended by both the Starman and by Mirkes.de - though we have hardly used it at all.
- MS DiskProbe. This can be found on most Win2K/WinXP installation CDs. There are four files that need to be extracted from the \SUPPORT\TOOLS\SUPPORT.CAB file. They are dskprobe.exe along with its three support files: dskprobe.cnt, dskprobe.hlp and dskprtrb.doc. If you have the CD this makes it into a freebie. It works under the NT-based OSes but is a bit outdated and not that easy to get to know.
Appendix: (Pre-compiled BartPE Plug-ins)
- Plugins included (no additional file download required): Nu2menu by Henk de Jong; BARTPE: Network Support by Bart Lagerweij; Bart's Stuff Test v5 by Bart Lagerweij; PENETCFG: PE Network configurator (theTruth) by Pierre Mounir (TheTruth); Boot Fix (Enabling "Press any key to boot from CD") by Bart Lagerweij; Check Disk (chkdsk.exe) by Bart Lagerweij; Custom by Bart Lagerweij; Profiles by Bart Lagerweij; QSoft Ramdisk by Christiaan Ghijselinck; Remote Desktop Client by Microsoft; Startup Group (autorun) by Erwin Veermans; Dos support for BartPE by Erwin Veermans; Keyboard Layout by Boris Mebarek; A43 File Management Utility by B.G. Miller; BartPE Installer v2 by Bart Lagerweij; Serial Mouse by Bart Lagerweij; Drive Snapshot by Tom Ehlert and PE Loader v0.4 by TheTruth
- Plugins included (but the user needs to download some files from the internet before using): BGInfo by Jeff Black; Total Commander by Christian Ghisler; Ad-Aware SE by Lavasoft; IrfanView by Irfan Skiljan; McAfee commandline virus scanner by Network Associates; Off By One Web Browser by Off By One Productions; PuTTY by Simon Tatham; McAfee AVERT Stinger by Network Associates; UltraVNC by UltraVNC Team; Adaptec ASPI by Bart Lagerweij; RPCSS Service Security Patch (KB824146) by Bart Lagerweij and Mozilla Embed by Bart Lagerweij
- Plugins included (but the user needs to buy the program): Disk Commander by Winternals; ERD Commander 2002 by Winternals; Ghost v8.0 by Symantec and Nero Burning Rom by Ahead Software.