# dd_rescue /dev/hda1 /media/sda5/cloone.img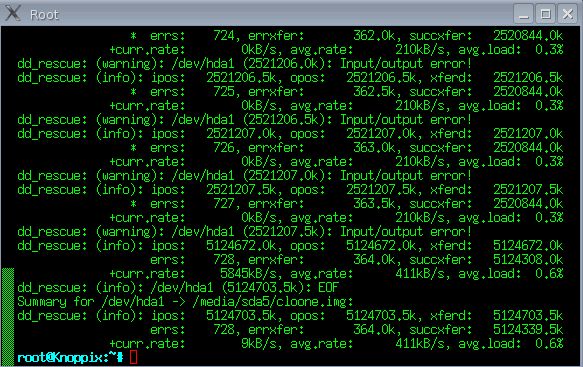 Fig 1
Fig 1# dd if=/dev/hda of=/media/sda5/mbr.dat bs=512 count=1We would like to describe the almost totally successful recovery of a system using two things, which we had previously been a bit sceptical about. The first was that of putting a hard drive in the freezer and the second was the use of the dd_rescue linux utililty on what was by then known to be a damaged hard drive.
We also describe, in an Addendum, how to use dd_rescue to simply clone one whole drive to another one.
Windows 2000 Professional; Seagate 10GB IDE; 512MB DDR; Asrock K8NF4G-SATA2; Sempron 3000.
System slow down and with some applications not functioning (eg Nero wouldn't burn disks). Slow or incomplete POST with the HDD sometimes being detected in the BIOS setup and sometimes not. BIOS messages such as F2 to Enter Setup or otherwise Continue would be followed by a freeze of the system. When the BIOS could be entered the size of the HDD was incorrectly identified as 5GB. Problems were intermittent and could happen on both cold and warm boots. The owners particularly wanted some pictures (2GB) to be made safe.
Once an external USB IDE HDD had been attached to copy the files to and after about 20 attempts the system just refused to boot-up any more (with or without the USB drive attached) and the HDD was not detected in the BIOS setup during this time. There were also audible noises and clunks from the HDD. A Knoppix Live CD would start to load with the normal display but then freeze. All of these actions were like watching things in slow motion.
Headed for bed but thought there was nothing to lose by putting the HDD into a ziplock plastic bag into the freezer. In the morning the HDD was reattached and the Knoppix CD (still in its drawer) just booted straight up in sprightly fashion after having whizzed through the POST screens. Both internal and external HDDs were identified as HDA and SDA respectively on the Knoppix Desktop. Both had two partitions on them.
# dd_rescue /dev/hda1 /media/sda5/cloone.img Fig 1# dd if=/dev/hda of=/media/sda5/mbr.dat bs=512 count=1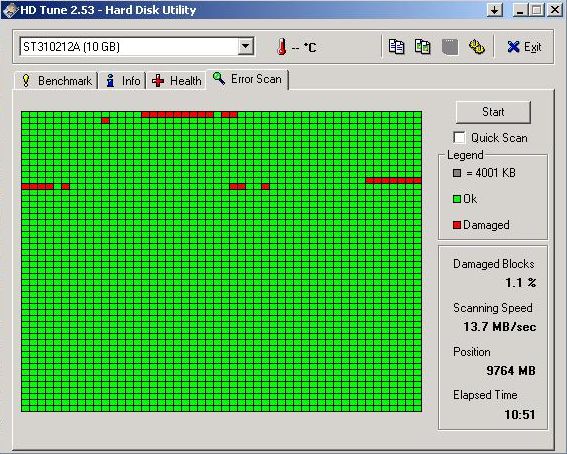 Fig 2
Fig 2# dd if=/media/sda5/mbr.dat of=/dev/hda# dd if=/media/sda5/cloone.img of=/dev/hda1Well - a very satisfactory and pleasing result. It really wasn't at all hard to do. We were very surprised that the "freezer trick" worked, since it has been a dismal failure in the past. We were absolutely delighted with dd_rescue and can see we will be using it in place of dd in the future as we grow in familiarity with it.
728 errors were found on the drive and it is apparently these that incredibly slow up such sector by sector copying and if the drive is getting unstable the warmer it gets then obviously time is of the essence.
We will use it in preference in particular because it tells you what progress it is making - one of the major faults with using dd. And Knoppix really is a "life-saver" - once again.
We have described above exactly how we used dd_rescue for the first time. We possibly made it more complicated than needs be by doing it in stages. That is by copying the contents of the only partition (hda1 in that example) to an image file and backing-up the MBR to another file. We then restored both of these files to a new hard drive. There can be advantages in creating a clone (of a partition or of a whole drive) as an image file, and indeed of knowing how to make a backup of the MBR, but in fact we could have done everything much more simply by just directly cloning drive-to-drive. As long as Knoppix can see the drives, be they internal or external floppy/hard drives (made of spinning magnetic or of solid-state flash memory media) then direct cloning should be both possible and likely to succeed. (As long as the output device is as large or larger than the input then the copying continues till the end of the input device is reached. If the output device is too small copying will continue till the the end of the output device is reached so only a partially complete clone would be created).
We thus now describe how we cloned a 32MB flash memory drive to another 32MB drive
using dd_rescue. The two drives became /dev/sdb and /dev/sdf in Knoppix 5.1.1. The root shell
was opened from "K-Start Menu ... Knoppix ... Root Shell". The simple command ...
dd_rescue /dev/sdb /dev/sdf
... was entered at the "root@Knoppix:~#" prompt. The whole process was quick (only 32 MB of course)
and the output is seen in the screenshot shown below. NB: all
original data on the second drive, sdf, was of course completely overwritten.
Always be absolutely clear that the second device, the outfile, has been correctly
identified before hitting the Enter key.
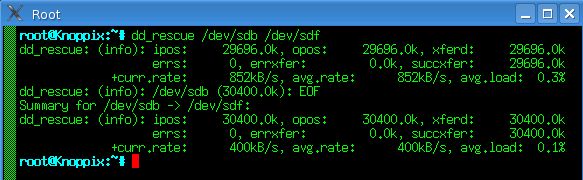
The second to fourth lines "dd_rescue: (info): ipos:" through to "avg.load: 0.3%" keep updating during the procedure and allow one to follow the progress. If bad blocks are encountered during cloning then additional error lines are displayed (as in the bad drive recovery outlined earlier) though in this example, and since both were good drives, no errors were detected. When completed the EOF line and Summary are displayed before returning to the "root@Knoppix:~#" prompt. It thus differs from using native dd not only because the progress can be followed but also because the infile and outfile device IDs are written simply as the respective devices, in that order and without the preceeding if= and of= prefixes as used by native Linux dd. If things seem a bit hard to comprehend perhaps read a few of the tips on our Back-up using Knoppix page.